This window is used to enter and edit your account data. It also provides tools for scheduling future transactions, finding and reporting on transactions and printing checks.
To open the Account Register Window for an account, select the account in the Account Tree then go to → or press Ctrl+O. This will open a new window with the Account Register. Pressing the button on the Toolbar in the Account Tree Window or the button in the Account Register Window are alternate methods.
 | Tip |
|---|---|
Appearance of the Account Register Display is highly customizable (see Section 6.1, “Changing the Register View”). | |
 | Note |
|---|---|
The methods to enter transactions are described in detail in Chapter 6, Common Transaction Operations. | |
The Menubar for the Transaction Register window contains the following options.
The following table describes the options in the .
Clicking on in the Menubar will “pull down” a menu of choices described in Table 4.11, “Account Register - Menu - Access to file and account operations and printing.”.
Table 4.11. Account Register - Menu - Access to file and account operations and printing.
Menu Item | Description | |||||
|---|---|---|---|---|---|---|
(Ctrl+N) |
Creates a new data file (starts with new accounts and data.) | |||||
(Ctrl+O) |
Opens an already existing | |||||
→ |
Opens the Import sub-menu to import files from other financial programs. | |||||
|
|
Starts the QIF file Import process. | |||||
|
|
Starts the OFX/QFX file Import process. | |||||
|
|
Starts the CSV/Fixed-Width file Import process. | |||||
|
|
Starts the replaying of a | |||||
|
|
. | |||||
|
|
. | |||||
|
|
. | |||||
|
|
. | |||||
(Ctrl+S) |
Saves the currently open file. | |||||
(Shift+Ctrl+S) |
Saves the currently opened file with a different name.
| |||||
(Ctrl+P) |
Starts the Print Checks assistant. See Section 6.14, “Printing Checks”. | |||||
(Shift+Ctrl+P) |
Let you choose the paper size, layout and margins for printing. | |||||
→ |
Exports ... | |||||
|
|
Exports your account hierarchy to a new file. Does not export data. | |||||
(Alt+Enter) |
Sets options for this | |||||
|
Numbered list of most recently opened | ||||||
(Ctrl+W) |
Closes the current open account tree, transaction register or report. In the initial Account tree this item is not available - it will be grayed out. | |||||
(Ctrl+Q) |
Exits | |||||

Table 4.12. Account Register - Menu - Access to file and account editing operations and preferences.
Menu Item |
Description |
|---|---|
(Ctrl+X) |
Performs a standard Cut operation. |
(Ctrl+C) |
Performs a standard Copy operation. |
(Ctrl+V) |
Performs a standard Paste operation. |
|
Open form to edit/modify account characteristics and parameters. | |
(Ctrl+F) |
Set criteria for a search for a specific transaction. See Section 7.1, “Find” for specifics on searches. |
( → on Mac OS X). |
Customize |
|
Modify/customize Style Sheets. | |
|
Set tax characteristics on account(s) (US). Assign tax form and line to account. See Section 9.4, “Setting Tax Report Options”. |
Table 4.13. Account Register - Menu - Changes GnuCash display window
characteristics.
Menu Item |
Description | |
|---|---|---|
|
Check-box to enable/disable display of Toolbar. | ||
|
Check-box to enable/disable display of Summary Bar. | ||
|
Check-box to enable/disable display of Status Bar. | ||
|
Radio button to select register display mode. | ||
|
Radio button to select register display mode. | ||
|
Radio button to select register display mode. | ||
|
Check-box to enable/disable display of Double Line display. | ||
|
Set the sort order of the transactions display. Requires a click to start options form. Option form requires / to close. | ||
|
Standard Order |
Keep normal account order | |
|
Date |
Sort by date | |
|
Date of Entry |
Sort by date of entry. | |
|
Statement Date |
Sort by the statement date (unreconciled items last). | |
|
Number |
Sort by number. | |
|
Amount |
Sort by amount. | |
|
Memo |
Sort by memo. | |
|
Description |
Sort by Description. | |
|
Action |
Sort by action field. | |
|
Notes |
Sort by notes field. | |
Set filtering for accounts displayed in the Account Tree or transactions in Register display. | ||
(Ctrl+R) | Repaint the display screen. | |
Open a new tab that display the account tree. | ||
Table 4.14. Account Register - Menu - access to transaction tools.
Menu Item | Description |
|---|---|
Cut the selected transaction into the clipboard. | |
Copy the selected transaction into the clipboard. | |
Paste the selected transaction from the clipboard. | |
Insert in the register a copy of the selected transaction. | |
Delete the selected transaction. | |
Remove all splits from the selected transaction. | |
Enter in the register the transaction you are currently working on. | |
Void the selected transaction. | |
Unvoid the selected transaction. | |
Table 4.15. Account Register - Menu - Setup scheduled transactions, repair accounts, perform stock splits, transfer and reconcile transactions.
Menu Item | Description | |||||
|---|---|---|---|---|---|---|
→ | This menu item (and sub-menu) is shown only if Online Banking
was enabled for GnuCash | |||||
|
| ||||||
|
|
Download transactions from online accounts | |||||
|
|
Upload transaction(s) to online account ?? | |||||
|
| ||||||
|
| ||||||
→ | Scheduled Transactions sub-menus | |||||
|
|
Invoke tool to edit scheduled transactions. See Section 6.13, “Edit Scheduled Transaction Window” | |||||
|
|
Display Scheduled transactions since last running of
| |||||
|
|
Starts the Mortgage & Loan Repayment assistant for setting up repayments. Section 7.3, “Mortgage & Loan Repayment Assistant” | |||||
→ | Budget sub-menus | |||||
|
|
Opens the window to create a new budget. | |||||
|
|
Opens an existing budget. | |||||
(Ctrl+T) |
Starts the Transfer assistant for transfer between accounts. | |||||
|
Start the Reconcile process for the selected account. Section 5.8, “Reconciling an Account to a Statement” | ||||||
|
Starts the Stock Split assistant. Additional details Section 7.4, “Recording a Stock Split” | ||||||
|
Opens the Lots in Account form. | ||||||
|
Move to the blank transaction at the bottom of the register | ||||||
Expand the currently selected transaction to show splits. | ||||||
|
Edit the exchange rate for the current transaction. | ||||||
|
Create a Scheduled Transaction with the current transaction as a template. | ||||||
|
Jump to the corresponding transaction in the other account. | ||||||
→ |
Check & Repair Submenus | |||||
|
|
Check for and repair unbalanced transactions and orphan splits in this account. | |||||
|
|
Check for and repair splits in this transaction. | |||||
|
| ||||||
|
Open the form to rename the current page/tab. | ||||||
The items shown in the menu are the same listed in Table 4.5, “Account Tree - Menu - Access small business features of GnuCash.”.
The items shown in the menu are the same listed in Table 4.6, “Account Tree - Menu - Access GnuCash Reports and Charts.” plus the
two types of report listed in the following.
The items shown in the menu are the same listed in Table 4.7, “Account Tree - Menu - Access to miscellaneous tools and editors”.
The items shown in the menu are the same listed in Table 4.8, “Account Tree - Menu”.
The items shown in the menu are the same listed in Table 4.9, “Account Tree - Menu - Access to this help and the Tutorial and Concepts Guide.”.
The GnuCash main Window has a number of
icons/buttons in the Toolbar
to quickly access some common functions used with the specific active
tab. The Toolbar can be hidden or shown by selecting the
item
on the menu.
| Note |
|---|---|
The specific options displayed in the Toolbar varies by the functions available to the active tab. | |
A brief description of the function of a button is displayed when the mouse pointer is placed over the button for a couple of seconds.
Table 4.16. Account Register (Transaction Register) Window Toolbar
Toolbar Buttons | Description |
|---|---|
(Ctrl+S) | Perform a save on the data file, commit all transactions to the data file. |
Close this register. | |
Make a copy of the current transaction. | |
Delete the current transaction in this register. | |
Record the current transaction. | |
Cancel the current transaction. | |
Move to a blank transaction at bottom of register. | |
Show all splits in the current transaction. Not highlighted if → is enableb. | |
Jump to the corresponding transaction in the other account | |
Create a Scheduled Transaction with the current transaction as a template. | |
Start the transfer assistant to transfer funds from one account to another. | |
Start the Reconcile process for the selected account. Section 5.8, “Reconciling an Account to a Statement” |
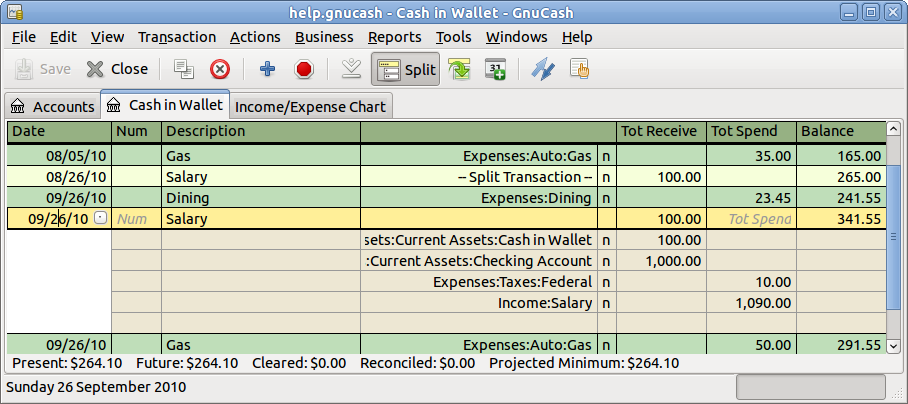
The Tab bar displays “notebook/file folder” style tabs for open transaction registers, account trees and reports.
The List of Transactions displays transactions you have entered and a running balance. It also provides a blank transaction to enter new transactions. The column headings vary according to what type of account you have opened. Common headings are Date, Description, Transfer and Balance.
The menu can be used to alter the appearance of the List of Transactions. Possible changes are limiting the number of transactions shown, using a different sort order and changing the style to more easily see transactions. The button also provides quick access to view all the parts of a transaction.
The Summarybar displays balances appropriate for the opened account type at a glance. Usually accounts display Present (today’s) account balance, any balance for Future dates, a balance for Cleared items, a Reconciled balance and a Projected Minimum balance. Stock accounts, however, display shares totals and their value. The Summarybar can be hidden or shown by selecting the → item.
The Statusbar works the same as described in Section 4.2.6, “Statusbar”.