In Chapter 4, you entered some transactions in your checking account. In this chapter, we will add more transactions and then reconcile them.
So, let's get started by opening the gcashdata file you saved in the last chapter (gcashdata_4). Your chart of accounts should look like this:
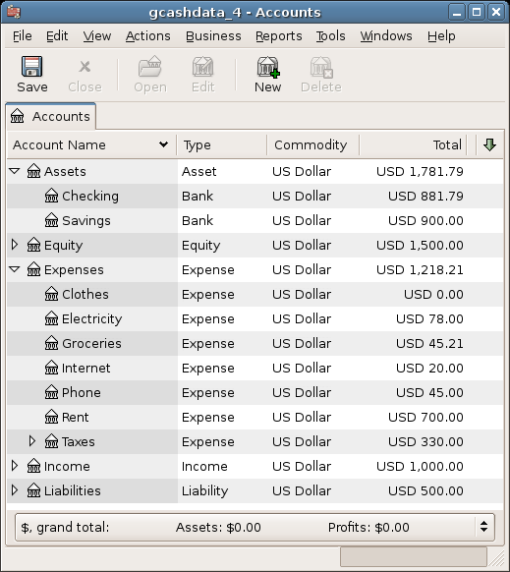
This image shows the Chart of Accounts.
Now open the Checking account from the main window. In the last chapter, you entered some paycheck transactions as deposits into Checking. Now we will enter another kind of deposit - a transfer of money from Savings into Checking. On a blank line, enter a transaction to transfer $500 from Savings to Checking (In this case, the last transaction date was March 28, but this transfer transaction took place on the March 24). Your Transfer account will be Savings, since you are in the Checking account. Your Checking account should now look like this:
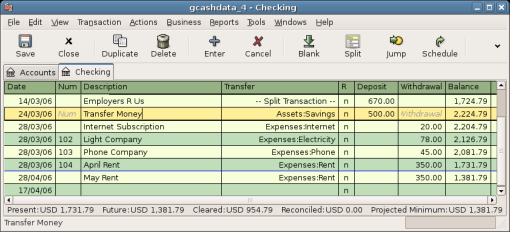
This image shows the Checking Account Register.
Now let's write some checks on this account. First, write a check to HomeTown Grocery for $75 (5 of March). Your transfer account is Groceries, since all of this money is going to buy groceries. Next, write a check to ABC Hardware for $100 (6 of March), and split this amount between two expenses: Household $50 and Tools $50. You will need to create an expense type account for each of these, then enter splits for them. Your checking account should now look like this;
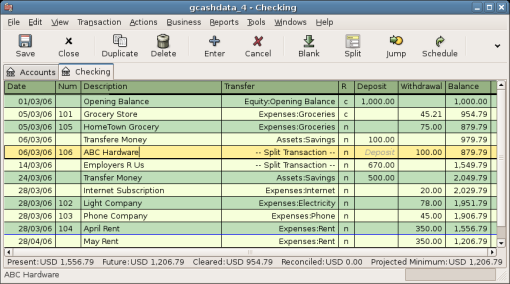
This image shows the Checking Account Register after registering some more checks.
Suppose you now need to withdraw some money. You don't have a cash account set up in your chart of accounts, so you will need to create one. Create the account as Cash as a top-level account of type Asset. From your Checking account register, enter an ATM type withdrawal to transfer $100 from Checking to Cash on the 25 of March.
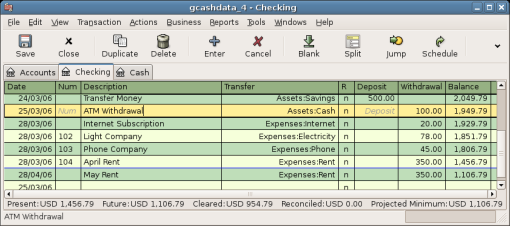
This image shows the Checking Account Register with an ATM withdrawal.
Now we are ready to reconcile this Checking account, using this sample bank statement:
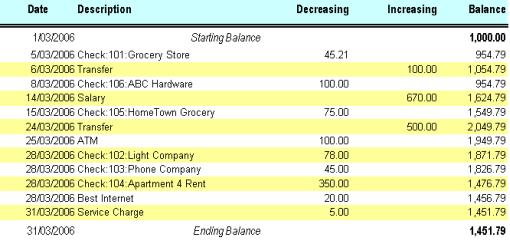
This image shows a sample Bank Statement.
Select Actions -> Reconcile from the menu, and fill in the Closing balance as $1451.79. Click OK to begin reconciling the account. Check off the entries as they appear on the sample statement. When you have checked off all your entries, the reconcile window should look like this:
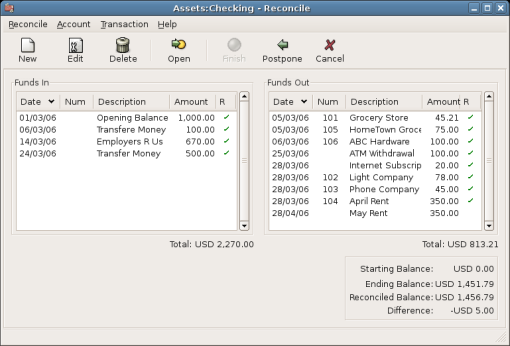
This image shows the reconcile window with a $5 difference.
Notice that your reconciled balance differs from your ending balance by $5.00. If you look at the sample bank statement, you will see there is a $5.00 service charge that has not been added to your Checking account.
So click on the Checking register and add the $5.00 service charge to your Checking account. On a blank line of the Checking register, enter a transaction to transfer $5.00 from Checking to a Service Charges account. (You will need to create the Service Charges account as type expense.) Use the transaction date printed on the sample statement as the date you enter for this transaction. Your Checking account should now look like this:
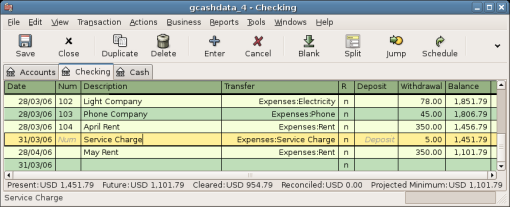
This image shows the Checking Account Register with service charge added.
Click back on the Reconcile window, and you should see the service charge now under Funds Out. Click on it to mark it as reconciled, and note that the difference amount below now becomes 0.00. Click the Finish button on the tool bar to complete the reconciliation. The Reconcile R column in your Checking register should now show y for each transaction you just reconciled. Also observe the bottom status row that now indicates "Reconciled: USD 1451.79"
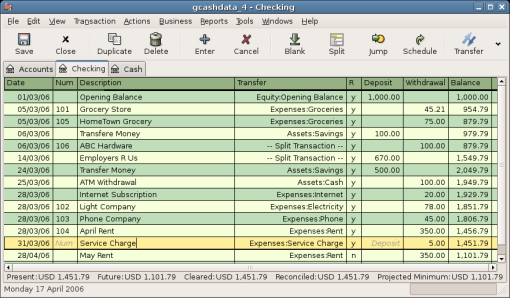
This image shows the reconciled Checking Account Register.
Go back to the main window and save your file with the new gcashdata_5 name. Your chart of accounts is steadily growing, and it should now look like this:
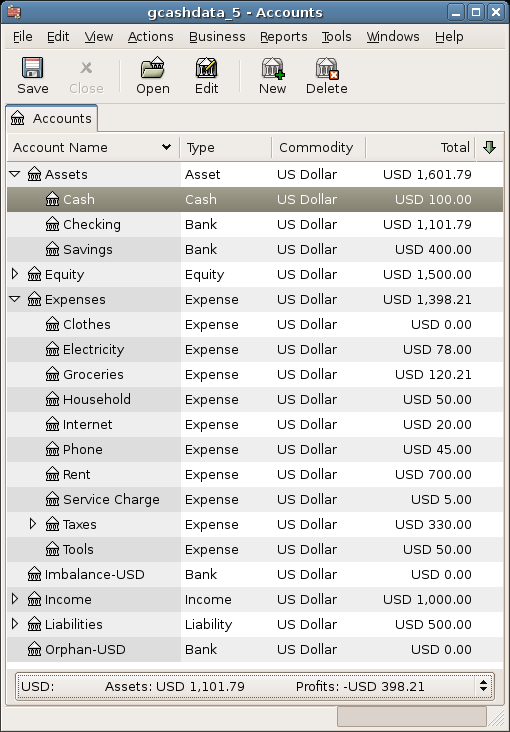
This image shows the Chart of Accounts.
As we did in the previous chapter, lets have a look at a Cash Flow, and a Transaction Report.
First lets have a look at the Cash Flow report for the month of March.
Select the cash flow report from Reports -> Income & Expense -> Cash Flow
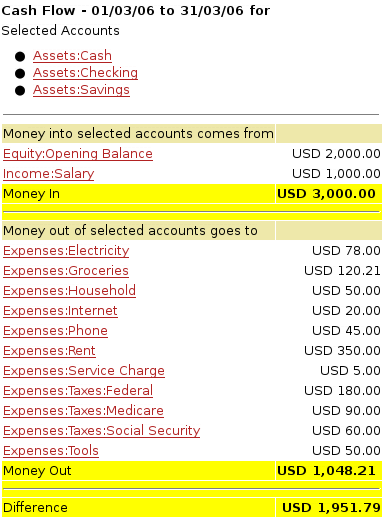
This image shows the Cash Flow report after Chapter 5.
Now lets have a look at corresponding transaction report for the various Asset accounts.
Select the transaction report from Reports -> Transaction Report
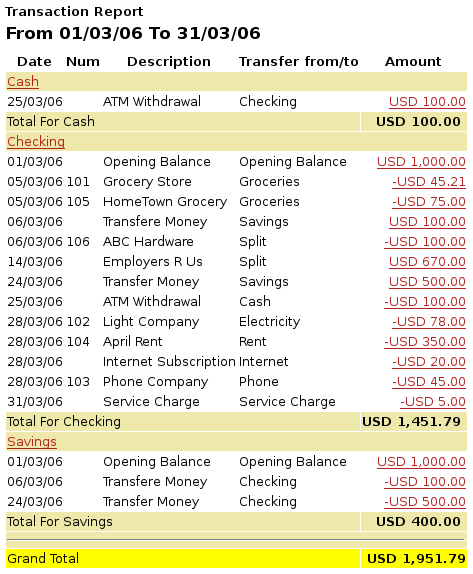
This image shows the Transaction Report for the Assets accounts during March.
Now lets change the transaction report to only show the various Expenses account.
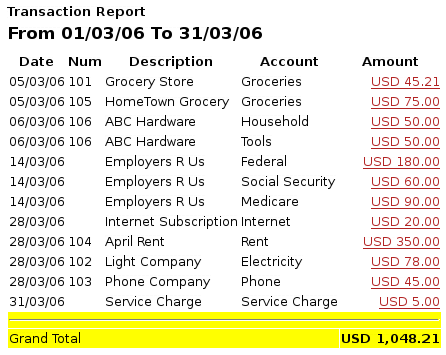
This image shows the Transaction Report for the various Expense accounts during March.
Notice that you have not yet used one of the accounts listed in your chart, the Credit Card account. Now that you know how to keep track of your bank and cash accounts in GnuCash, you may want to start tracking your credit cards as well. GnuCash provides a special type of account for credit cards, and this is discussed in the next chapter.