The account register is the GnuCash window, which allows you to view or edit
preexisting transactions, or add new transactions for a particular account. To open an
account register from the Account Tree, double-click the account name, right click the
account name and select Open Account from the menu, or use the Open button on the toolbar.
GnuCash will display the account register window.
The Titlebar of the account register displays the account name. Below the Titlebar, the Menubar displays the menu items available within the account register, and the Toolbar contains handy buttons that help you work with the account register.
In basso a sinistra nella finestra del registro, GnuCash visualizza degli utili messaggi mentre ci si
muove nel registro. A destra, invece, è possibile leggere il saldo attuale del conto e
il totale delle suddivisioni liquidate.
GnuCash offers several options for viewing your registers. The default style is Basic
Ledger mode, which displays only the summary of splits affecting the current
account. This is the style that most closely resembles other popular personal financial
packages. You can choose a different register style from the
menu. There are two other view modes:
→ style expands the current transaction automatically. As you highlight a new transaction in the register, the transaction automatically expands to show all splits.
→ style shows all splits for all transactions in the register, which is more like an accounting journal.
All styles permit you to view your data in either single-line or double-line format. Select → , and you will see your transaction line expand to two register lines. Double-line mode will also display the transaction-level Notes field.
Below are screenshots that demonstrate how the Basic Ledger and Transaction Journal views differ.
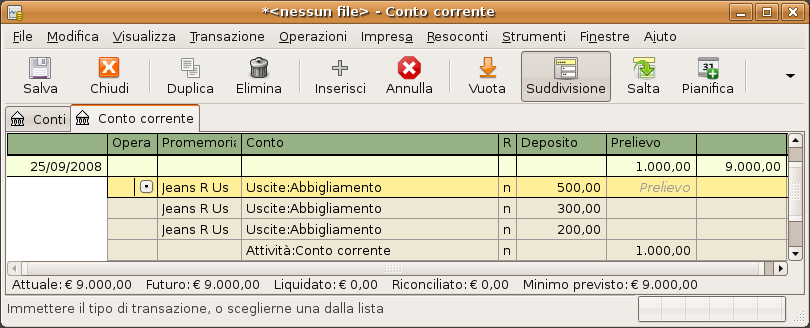
For this example, let’s assume that you have purchased 3 pair of Jeans for $1,000, and have recorded the purchase as a split transaction with each pair entered on a separate split.
The below screenshots illustrate the different view modes.
First let’s view the Jeans transaction from your checking account:
Now, let's open the Expenses:Clothes account, and look at it in Basic view.
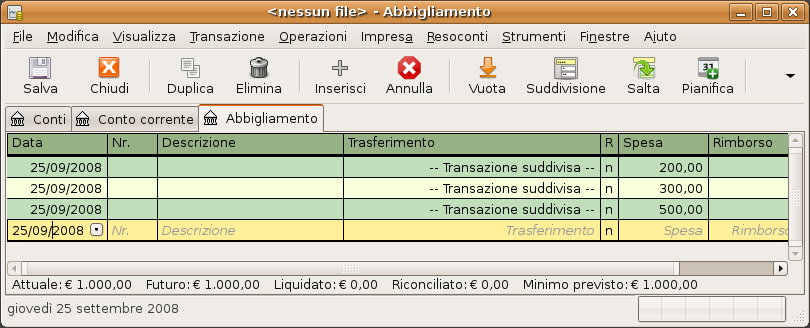
Three entries appear here, but there was only the single split entry in the checking account. Further examination shows that each row has a different amount, $200, $300, and $500. This demonstrates that each row in this view reflects a single split from the original transaction.
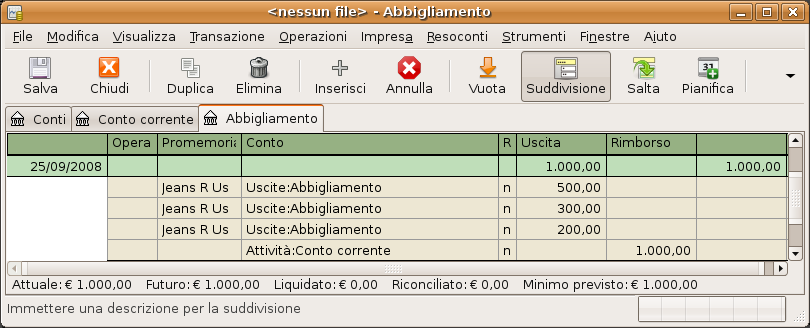
Changing to Transaction Journal mode will display only the original split transaction.
GnuCash provides several time-saving shortcuts for entering your data. When you type the first few
characters of a description that you have used before, the QuickFill feature
automatically fills in the rest of the transaction as you last entered it. When you type
in the first characters of an account name in either the Transfer
field of the transaction line or the Account field of the split
line, QuickFill will automatically complete the name from your account list. It also
helps you with entering sub-accounts in these fields: simply type the first characters
of the parent account name followed by a : (colon) and the first
characters of the sub-account name. For example, to enter
Assets:Checking, you might type A:C and let
GnuCash fill in the rest.
 | Avvertimento |
|---|---|
Because : is the account separator symbol, you can not use it in your account names. | |
 | Suggerimento |
|---|---|
If you really need the colon in your account names, you can select another symbol by → → +Character . | |
Anche le scorciatoie da tastiera per il registro permettono di risparmiare tempo e GnuCash ne fornisce
diverse. Nel campo della data si può premere:
+ o = per aumentare la data e - o _ per diminuire la data
] o } per aumentare il mese e [ o { per diminuire il mese
M o m per inserire la prima data del mese
H o h per inserire l’ultima data del mese
Y o y per inserire la prima data dell’anno
R o r per inserire l’ultima data dell’anno
T o t per inserire la data odierna
| Suggerimento |
|---|---|
These date shortcuts not only work in the account register but everywhere you can enter a date. | |
| Suggerimento |
|---|---|
Specifically for dates there's another way you can save time: you can enter partial dates. For
example if you only enter one number, | |
Nel campo Nr. nella linea di una transazione, è possibile premere
+ per incrementare il numero della transazione, mentre premendo
- verrà diminuito il numero. Questo funzionerà anche nel campo
Operazione nella linea della suddivisione, se si sceglie di
immettere i numeri della suddivisione qui. Il campo Operazione
supporta anche Quickfill: se si digitano i primi caratteri di una
operazione comune (come Deposito), GnuCash completerà il resto.
Il campo Trasferimento supporta il Quickfill dei nomi dei
conti. Iniziando a digitare il nome di un conto, GnuCash completerà la parte restante del
nome con quello di un conto esistente. Digitando il carattere separatore in qualsiasi
momento, verrà completato il livello corrente del nome del conto, lasciando il cursore
posizionato all’inizio del successivo livello di nomi di conti. Digitando, per
esempio,
A : C
con il gruppo standard di conti, verrà selezionato il conto Attività:Conto
corrente. Si possono anche selezionare i tasti Menu o
Ctrl+Giù
in questo campo per visualizzare la lista a comparsa dei nomi dei conti.
In ognuno dei campi per l’importo, si può usare una calcolatrice incorporata. Digitare
semplicemente il primo valore, seguito da un +, -,
* o /, poi inserire il secondo valore. GnuCash eseguirà
i calcoli e restituirà il valore risultante nel campo dell’importo alla pressione
del tasto Tab.
Per tutte le voci del menu sono definite delle chiavi di accesso che sono indicate da caratteri sottolineati nei nome del menu. Premere Alt + [carattere sottolineato] per aprire il menu desiderato e selezionare poi una voce digitando il carattere sottolineato corrispondente. Per esempio, premere Alt+T per far comparire il menu , poi premere S per suddividere la transazione. Alcune delle voci del menu hanno anch’esse delle scorciatoie che immediatamente invocano il comando (normalmente utilizzando il tasto Ctrl). Queste scorciatoie sono riportate a fianco della voce.
Per muoversi nel registro, utilizzare questi tasti per risparmiare tempo:
Tab per spostarsi al prossimo campo, Maiusc+Tab per spostarsi nel campo precedente
Home per spostarsi all’inizio del campo, Fine per spostarsi alla fine del campo
Invio o ↓ per spostarsi alla transazione successiva, ↑ per spostarsi alla transazione precedente
Pag Sù per muoversi verso l’alto di una schermata, Pg giù per muoversi verso il basso di una schermata
Maiusc+Pag Sù per raggiungere la prima transazione, Maiusc+Pag Giù per raggiungere l’ultima transazione
Nella finestra Riconcilia possono essere usate le seguenti scorciatoie da tastiera:
Tab sposta al riquadro successivo e Maiusc+Tab sposta al riquadro precedente
La barra spaziatrice alterna lo stato tra riconciliata e non riconciliata
↑ e ↓ permettono di spostarsi tra gli elementi nel riquadro selezionato