To set up GnuCash to handle accounts receivable or accounts payable for a company, these preliminary
steps must be done.
Build an appropriate Account Hierarchy.
Set up Sales Tax Tables.
Enter the company information in
GnuCash.Set Business Preferences.
Set up Billing Terms.
There are many different ways to set up a business account hierarchy. You can start with the
Business Accounts setup which is available from the New Account Hierarchy assistant, or you
could build one manually. To access the prebuilt Business Accounts, start GnuCash and click on
→
and proceed until you see the list of available accounts, select Business Accounts.
The prebuilt Business Account hierarchy will not meet your needs exactly. You will need make adjustments to the hierarchy so that it will meet your particular needs. It should be close enough, however, that it is recommended you begin with it.
To use GnuCash’s integrated accounts receivable system, you must first set up a special account
(usually a sub-account under Assets) to hold transactions for receivables. This account must
be defined with account type A/Receivable. GnuCash will use this account
to place transactions related to the integrated accounts receivable system.
To use GnuCash’s integrated accounts payable system, you must first set up an account (usually a
sub-account under Liabilities) to hold transactions for payables. This account must be
defined with account type A/Payable. GnuCash will use this account to
place transactions related to the integrated accounts payable system.
Basic A/R and A/P Account Hierarchy:

-Assets
   -Accounts Receivable
   -Checking
-Expenses
  ...(as required)
-Income
   -Sales
-Liabilities
  -Accounts Payable
  -Tax
      -Tax on Purchases
      -Tax on Sales
You need to add additional accounts to this hierarchy for it to be useful.
 | Note |
|---|---|
You do not need to create an individual A/R account for each customer. | |
| Note |
|---|---|
If you deal with customers in more than one currency you will need a separate Accounts Receivable account for each currency. If you deal with vendors in more than one currency you will need a separate Accounts Payable account for each currency. | |
| Note |
|---|---|
Transactions involving an Accounts Receivable or Accounts Payable account should not be added, changed or deleted in any way other than by using Post/Unpost Bill/Invoice/Voucher or Process Payment! | |
Sales Tax Tables can used to determine the tax for customer invoices (or vendor bills).
A tax table entry can be assigned to an invoice line or bill line.
Set up distinct tax tables for customers and vendors.
The default invoice tax table entry can be assigned to each customer and the default bill tax table entry can be assigned to each vendor.
The default tax table entry for new customers or new vendors can be specified in the Book Options window which can be accessed by → →
Sales Tax Tables are maintained using the Sales Tax Table editor which is accessed via menu → .
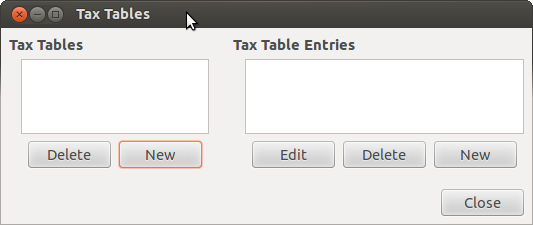
Name This is the tax table name.
Type Either Percent % or Value $.
Value This is the percentage or value depending on Type.
Account This is the account to which tax will be posted. For tax collected from customers, this should probably be a Liability account as it must be payed to the government. For tax paid to vendors, if tax laws allow tax paid to vendors to offset tax collected from customers, this should probably also be a Liability account (even though it will usually have a debit balance) so that the net tax owed to the government can be easily observed.
If you set up Tax on Purchases and Tax on Sales as subaccounts of Liabilities:Tax then the net tax will be rolled up and can be seen in the
GnuCashAccounts tab.If unsure about tax law requirements, get professional advice.
The following charts illustrate sample tax tables and may be used as starting points to determine the setup appropriate for a particular jurisdiction.
Table 13.1. Sample Tax Table Entries for EU country (e.g. 21% / 6% / 0% Belgium, 20% / 5% / 0% UK etc.) (2017)
| Tax Table | Tax Table Entries [Asset/Liability] | Percentage or Amount |
|---|---|---|
| Standard VAT Sales | VAT:Sales:Standard [L] | 21% |
| Reduced VAT Sales | VAT:Sales:Reduced [L] | 6% |
| Zero-Rated VAT Sales | VAT:Sales:Zero [L] | 0% |
| EC Sales | VAT:Sales:EC [L] | 21% |
| VAT:Sales:Reverse EC [L] | -21% | |
| Standard VAT Purchases | VAT:Purchases:Standard [A] | 21% |
| Reduced VAT Purchases | VAT:Purchases:Reduced [A] | 6% |
| Zero-Rated VAT Purchases | VAT:Purchases:Zero [A] | 0% |
Table 13.2. Sample Tax Table Entries for Australia (2017)
| Tax Table | Tax Table Entries [Asset/Liability] | Percentage or Amount |
|---|---|---|
| Standard GST Sales | GST:Sales:Standard [L] | 10% |
| GST-free Sales | GST:Sales:Zero [L] | 0% |
| Standard GST Purchases | GST:Purchases:Standard [A] | 10% |
| GST-free Purchases | GST:Purchases:Zero [A] | 0% |
Table 13.3. Sample Tax Table Entries for Cook County, Illinois (2017)
| Tax Table | Tax Table Entries [Asset/Liability] | Percentage or Amount |
|---|---|---|
| Chicago Sales Taxes | Taxes:Sales:State [L] | 6.25% |
| Taxes:Sales:City [L] | 1.25% | |
| Taxes:Sales:County [L] | 1.75% | |
| Taxes:Sales:Region [L] | 1% |
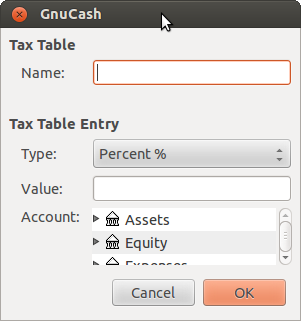
After you have built the account structure and defined your tax tables, designate your company in
the GnuCash file. To do this, select the Business tab in the
Book Options window, which can be accessed from
→
.
Here you can:
Enter the name of your company along with contact information such as your phone number, fax number, e-mail address and website URL.
Enter your company’s tax payer id number in the Company ID field.
Select default tax tables applicable to your most common customers and vendors.
Set options on the Business tab of the GnuCash preferences, which is accessed via
→
(
→
on macOS). See GnuCash Manual chapter 10.3.3 Business Book Options Tab.
Billing Terms can be used to determine the payment due date and be a guide for determining discount for early payment of invoices (or vendor bills).
| Note |
|---|---|
As of Discount for early invoice payment is not implemented. There are 2 ways this may be done, although neither is recommended, and professional advice should be used to confirm that regulations are being complied with:
| |
You can specify the billing terms on each invoice/bill. Invoice billing terms will default from the customer billing terms. Bill billing terms will default from the vendor billing terms.
Billing Terms are maintained using the Billing Terms Editor which is accessed via menu → .
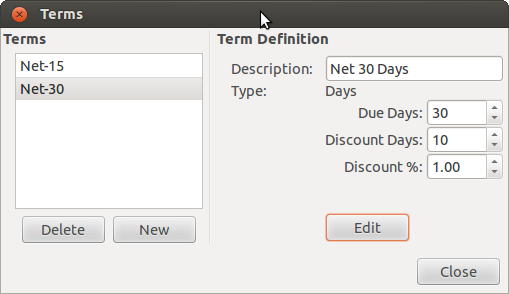
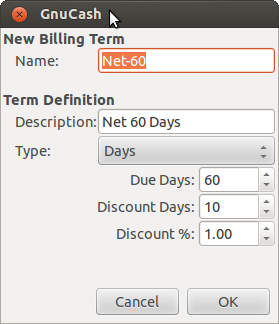
Name The internal name of the billing term. For some examples of billing term names and descriptions see https://wiki.gnucash.org/wiki/Payment_Terms.
Description The description of the billing term, printed on invoices
There are 2 types of billing terms, with different information to be entered
Type Days
Due Days The invoice or bill is due to be paid within this number of days after the post date
Discount Days The number of days after the post date during which a discount will be applied for early payment
Discount % The percentage discount applied for early payment
Type Proximo
Due Day The day of the month bills are due
Discount Day The last day of the month for the early payment discount
Discount % The discount percentage applied if paid early
Cutoff Day The cutoff day for applying bills to the next month. After the cutoff, bills are applied to the following month. Negative values count backwards from the end of the month.